
Disclosure: I earn a commission if you buy through some links on this page, at no extra cost to you. It never changes what I recommend, and I tell you where a cheaper or free option works just as well. How we review
To make a website you need three things: a domain name (your address, about $12 a year at Namecheap), web hosting (where the site lives, from $3.99 a month at Bluehost) and WordPress (free software to build it). Budget about $60 for the first year and two to four hours for a simple business site. If you’d rather not touch WordPress, Bluehost’s AI Builder can draft a site for you from one paragraph, and it’s $0 to start, no credit card.
Most “how to make a website” guides stop the moment WordPress is installed. That’s about a third of the job. A real website for a real business also needs a logo, pages people actually read, an email address that matches the domain, a way to show up on Google, and a plan for what it will cost in year two, when the intro prices end.
This guide covers all of it, in the order you’ll do it. I’ll tell you which service I’d pick at each step and why, what to click, what to skip at checkout, and where a free option is good enough. Follow along with a browser tab open and you’ll finish with a site that’s live, secure and ready for customers.
What a website really costs
Here’s a realistic budget for a small business site built the way this guide describes. Prices were checked in November 2026.
| Item | My pick | Year 1 | Required? | |
|---|---|---|---|---|
| Domain name (.com) | Namecheap | $12.08 | Yes | Visit Namecheap |
| Web hosting | Bluehost Starter | $47.88 ($3.99/mo) | Yes | Visit Bluehost |
| WordPress + theme | Free theme | $0 | Yes | Included with hosting |
| Logo | Logomaker | $0 to design; files from $2.99/mo | Recommended | Visit Logomaker |
| Business email | Spacemail Pro | $0 for 30 days, then $18.88 for 2 years | Recommended | Visit Spacemail |
| Security and backups | Jetpack or host backups | $0 to start | Recommended | Visit Jetpack |
| Total (essentials) | About $60 |
Intro prices don’t last forever. Bluehost’s $3.99 rate is locked in for the full 36-month term, then it renews at $9.99 a month, and the Namecheap .com renews at $19.98 a year. Plan on about $140 a year once the intro prices end. Our web hosting renewal prices page tracks renewals for every major host.
Step 1: Decide what your site needs to do
Before you buy anything, spend ten minutes on paper. The answers decide which plan you need and which pages you build.
- What’s the one action you want visitors to take? Call you, request a quote, book an appointment, buy something, or join an email list. Every page should point toward it.
- Who is it for? A local customer on a phone needs your number and service area in seconds. A shop customer needs product photos and checkout.
- What pages do you need? Most small businesses need five: Home, About, Services (or Products), Contact and a Privacy Policy.
- Will you sell online? If you’re selling more than a handful of products, read our online store guides first. A shop changes the plan you need.
WordPress or a website builder?
This guide uses WordPress, which runs a huge share of the web. It’s free, it can grow into anything, and you own every file. The trade-off is that you look after it yourself. A website builder trades flexibility for convenience.
Choose WordPress if you…
WordPress + hosting- want the lowest long-term cost
- want to own your site and move hosts any time
- may add a blog, booking or a store later
- are fine spending a few hours learning
- care about SEO control
Choose an AI builder if you…
Bluehost AI Builder- need a simple site live today
- don’t want to deal with themes or plugins
- are happy editing by typing requests
- run a local service business
- would rather pay a flat monthly fee
Not sure? Read on. The steps for the domain and logo are the same either way, and I cover the AI Builder route in its own section below.
Step 2: Pick a name and register your domain
Your domain is your address on the web, like yourbusiness.com. It’s also the part people type, say out loud and see on your van, so it’s worth getting right.
How to choose a good domain name
- Get the .com if you can. People assume it. A .net or .co is fine when the .com is taken, but expect some of your traffic to wander to whoever owns the .com.
- Keep it short and easy to say. If you have to spell it out on the phone, it’s too complicated. Avoid hyphens and numbers.
- Use your business name, or name plus place or service. “gulfbreezegutters.com” beats “bestguttercleaningfl.com”.
- Check social handles at the same time, so your Instagram and Facebook can match.
- Don’t use someone else’s trademark, even with a twist. It can cost you the domain later.
Where I register domains: Namecheap
I keep my own domains at Namecheap. A .com is $12.08 for the first year on its current sale and renews at $19.98. Namecheap almost always has a coupon running though, and new customers can often get a .com for around $6, so check today’s Namecheap coupons before you check out. More important, domain privacy is free for life, so your home address and phone number don’t end up in public WHOIS records and spam lists.
You can also take the free domain that comes with Bluehost and most other hosts for the first year. It’s simpler, and it’s a fine choice. I keep domains separate from hosting for one reason: if I ever switch hosts, my domain doesn’t move with the account, so there’s nothing to untangle. For a first website, either way works.
Checkout tip: Paste your coupon code in the cart first. Namecheap will also offer extras like premium DNS and an SSL certificate. Skip them for now. Your host gives you a free SSL certificate, and the standard DNS is fine for a small business site.
Search for your name, add the .com to your cart, keep the free privacy on and check out. Write down the login, because you’ll need it in Step 5.
Step 3: Make a logo (free to design)
You don’t need a $500 designer for a first logo. You need something clean and readable that works at small sizes: in your website header, as a browser tab icon and on a business card.
Logomaker is the quickest way I’ve found. You type your business name and pick your industry, and its AI generates a few thousand designs you can filter by style and edit. Designing is free and needs no credit card. When you’re happy, you pay for the files, with packages starting at $2.99 a month. Every package includes PNG, JPEG, PDF and vector files, plus a transparent-background version, which is the one you’ll need for your website header.
- Pick two colors and stick to them. Your site will reuse them for buttons and headings.
- Test it tiny. Shrink it to the size of a phone header. If the text disappears, simplify.
- Download the transparent PNG. A logo with a white box behind it looks amateur on any colored background.
While you’re there, Logomaker also prints business cards (from $5) and branded shirts with the same logo, which is handy for a service business that wants to look the part on day one.
Step 4: Choose your web hosting
Hosting is the computer your website lives on. For a new small business site, cheap shared hosting is plenty: you share a powerful server with other sites, and the host handles the hardware, security patches and backups. You can upgrade later without rebuilding anything.
My pick for most people: Bluehost Starter
Renews at $9.99/mo
- WordPress installed for you during setup
- Free SSL, CDN and malware scanning
- Room for 10 sites on the cheapest plan
- Recommended by WordPress.org
- Phone support only on Business and up
- Best price needs a 3-year prepay
- Renewal is 2.5× the intro price
Bluehost is built around WordPress. During signup it sets up WordPress, your SSL certificate and a starter site, so you skip the most technical parts of this guide. The Starter plan covers 10 websites, 10 GB of fast NVMe storage, about 40,000 visits a month, a free CDN, malware scanning and weekly backups.
The 36-month term gives you the $3.99 price for all three years, which is why I recommend it. You pay about $144 upfront, and there’s a 30-day money-back guarantee if it isn’t for you. Just put a reminder in your calendar for renewal time, when the price rises to $9.99 a month.
What to choose (and skip) at checkout
- Plan: Starter is enough for one business site. Pick Business ($6.99/mo, renews at $13.99) only if you want phone support or plan to run several busy sites.
- Term: 36 months for the best price. Shorter terms cost more per month.
- Domain: if you already bought one at Namecheap, choose “use a domain I own”. If not, take the free one.
- Extras: skip paid add-ons such as extra security or SEO tools for now. The free SSL, malware scan and the plugins in Step 9 cover a new site. You can add anything later.
Good alternatives
| Host | Best for | Intro price | Renews at | Sites | Money-back |
|---|---|---|---|---|---|
| HostGator | Many small sites on a budget | $3.75/mo | $10.99/mo | 10 | 30 days |
| HostPapa | Lowest starting price | $1.25/mo (Black Friday) | Regular rate | 1 | 30 days |
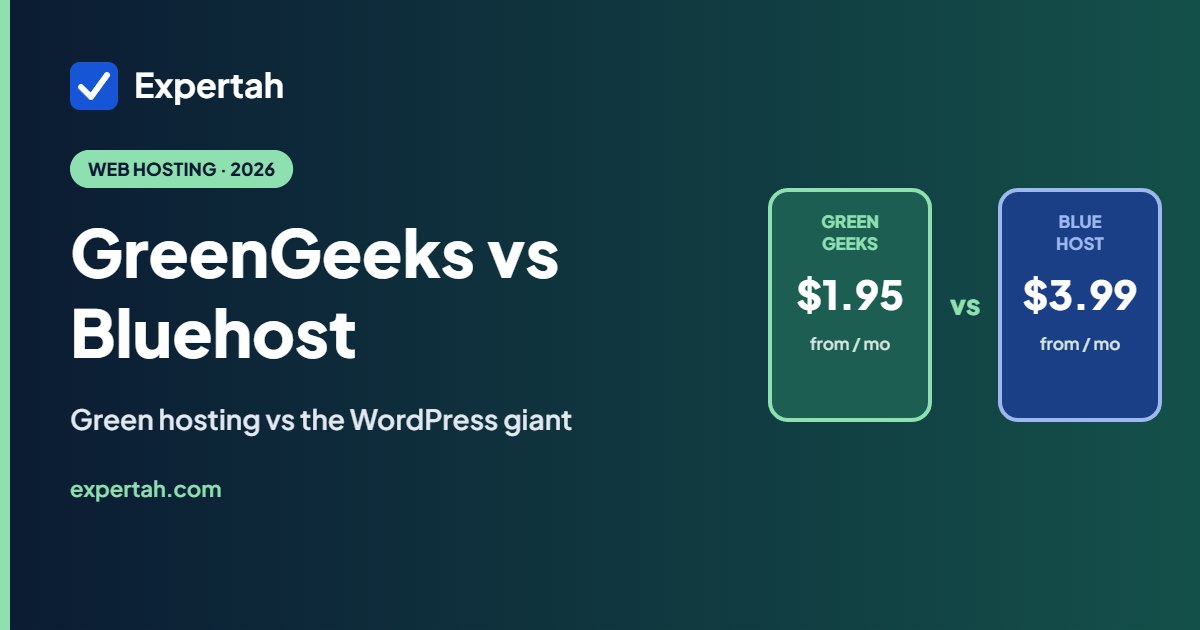
| GreenGeeks | Eco-friendly hosting | $1.95/mo | ~$13.95/mo | 5 | 30 days |
| DreamHost | Long refund window | $2.89/mo | ~$7.99–$10.99/mo | 1 | 97 days |
All four include a free SSL certificate and one-click WordPress. HostGator is run by the same company as Bluehost and feels very similar. DreamHost’s 97-day money-back guarantee is the longest here. For the full comparison, see our best shared hosting guide or cheapest web hosting that stays cheap.
Step 5: Connect your domain to your host
Skip this step if you took the free domain from your host. It’s connected already.
If your domain is at Namecheap, you need to tell it where your website lives. You do that by changing its nameservers, the address book entry that points your domain at your host.
- Log in to Bluehost and add your domain to your account (look for “Domains” → “Add domain” or “Use a domain I own”). Bluehost shows you the nameservers to use.
- In a second tab, log in to Namecheap and open Domain List → Manage next to your domain.
- Under Nameservers, choose Custom DNS and enter the two nameservers your host gave you. For Bluehost they’re usually
ns1.bluehost.comandns2.bluehost.com. - Click the green check to save.
Changes usually take effect within an hour, but can take up to 48 hours to reach everyone. While you wait, keep building. Bluehost gives you a temporary address to work on.
Planning a business email? If you use Google Workspace or another email provider, you’ll add a few more DNS records later (Step 10). It’s easiest to manage them in one place, which is your host’s DNS once the nameservers point there.
Step 6: Install WordPress
On Bluehost this is done for you during signup: it asks a few questions about your site and installs WordPress automatically. Most other hosts have a one-click installer in their control panel, usually labeled “WordPress” or “Softaculous”.
Either way, you’ll end up with a login page at yourdomain.com/wp-admin. Before you build anything, do these five things:
- Turn on SSL. Your address should start with https:// and show a padlock. Bluehost and the hosts above issue a free certificate automatically. If yours doesn’t show, look for “SSL” in your hosting dashboard.
- Set your site title and tagline under Settings → General.
- Set permalinks to “Post name” under Settings → Permalinks, so your pages get clean addresses like /contact/ instead of /?p=12.
- Delete the sample content: the “Hello world!” post, the sample page and any plugins you didn’t install yourself.
- Use a strong, unique password and turn on two-factor login if your host or a security plugin offers it.
Step 7: Pick a theme
A theme controls how your site looks: fonts, colors, header and layout. You can change it later without losing your content, so don’t overthink it.
Start with a fast, free, well-supported theme. Astra, GeneratePress and Kadence are all free, load quickly and come with ready-made starter sites for common businesses. WordPress’s own default theme works well too, especially if you like the built-in block editor.
- Import a starter site that matches your industry, then swap in your logo, colors and words. It’s much faster than starting from a blank page.
- Use your logo’s two colors for buttons and headings, and leave the rest neutral.
- Avoid heavy “do everything” themes for a first site. More features usually means a slower site and a steeper learning curve.
Step 8: Build the pages that matter
Write for someone in a hurry on a phone. Short paragraphs, clear headings and your main action button near the top of every page.
| Page | What goes on it |
|---|---|
| Home | One sentence on what you do and where, a big button for your main action, three to six services or products, a few reviews, and your phone number. |
| About | Who you are, why you started, how long you’ve been doing it, and a real photo. People hire people. |
| Services / Products | One section per service with what’s included, who it’s for, and a starting price if you can share one. Prices build trust and filter out bad leads. |
| Contact | Phone, email, a short form, your service area or address, and your hours. |
| Privacy Policy | Required if you collect any information, including a contact form or analytics. WordPress has a built-in template under Settings → Privacy. |
Optional but useful: a FAQ page that answers the questions you get on every call, a Reviews page, and a blog if you’re willing to post helpful articles regularly. Blogging is the cheapest way to get found on Google over time.
Use your own photos. Stock photos are fine to start, but a real photo of you, your team and your work does more for trust than anything else on the page. A phone camera in daylight is enough.
Step 9: Add a few essential plugins
Plugins add features. Every plugin is code that has to be kept updated, so install only what you need. For a new business site, that’s about five:
| Job | Plugin | Cost |
|---|---|---|
| SEO | Rank Math or Yoast: titles, descriptions and a sitemap for Google | Free |
| Contact form | WPForms Lite or the form in your theme | Free |
| Backups and security | Jetpack: automatic backups, malware scanning and downtime alerts | Free plan; paid backups extra |
| Firewall | Sucuri if your site handles payments or gets attacked often | Paid (optional) |
| Speed | WP Rocket for one-click caching and faster pages | Paid (optional) |
Bluehost already makes weekly backups and scans for malware, so a basic site can start with just the free plugins and add the paid ones as it grows. For a deeper walkthrough, our Sucuri review explains when a firewall is worth paying for.
Step 10: Set up a business email address
you@yourbusiness.com looks far more trustworthy than a Gmail address on an invoice or a quote, and it costs very little.
My pick: Spacemail
Spacemail is the business email service from Spaceship, and it’s the cheapest good option I’ve found. The Pro plan gives you one mailbox with 5 GB of storage, 10 aliases (extra addresses like info@ and quotes@ that land in the same inbox), a calendar, a mobile app, two-factor login and an AI writing assistant for $18.88 for two years, and it renews at the same price. That works out to about 79 cents a month. You get 30 days free to try it first.
It works with a domain registered anywhere, including Namecheap, and it connects with Outlook, Apple Mail or Gmail’s app if you prefer those. Need a few people on it? The Business plan includes three mailboxes for $28.68 for two years.
Start the free 30-day Spacemail trial, connect your domain, and create your first address.
Other good options
- Google Workspace: Gmail, Calendar and Drive on your own domain. It costs more per person, but it’s the easiest choice if your team already lives in Gmail and Google Docs.
- Your host’s email: Bluehost includes a free trial of its Pro Email service, fine for a quick start.
- Zoho Mail: has a free plan for a small team, if you want to keep costs at zero.
Whichever you choose, the provider will give you a few DNS records (called MX, SPF and DKIM) to add at your host. Add all of them. They prove your email is really from you, so it lands in inboxes instead of spam. Our best business email providers guide compares the options in detail.
Step 11: Get found on Google
A new site won’t show up on Google by itself for a while. These steps speed things up and cost nothing but time:
- Create a Google Business Profile (free) if you serve customers locally. It’s what puts you on Google Maps and in the local results, and for many service businesses it brings more calls than the website does.
- Add your site to Google Search Console and submit the sitemap your SEO plugin created. You’ll see which searches show your site and spot problems early.
- List your business in the main directories with the same name, address and phone number everywhere: Apple Maps, Bing Places, Yelp, Facebook and your industry’s directories. Logomaker’s local listings service can push your details to dozens of directories at once if you’d rather not do it by hand.
- Ask happy customers for Google reviews. Send them the direct link from your Business Profile. Reviews are one of the strongest local ranking signals.
Step 12: Your launch checklist
Before you tell anyone about the site, run through this list on your phone and on a computer:
Want it on paper? Get the free printable checklist with all 12 steps, the budget and your renewal dates on 4 pages.
- Every page loads with the padlock (https).
- Your phone number is tappable on mobile and your main button works.
- The contact form sends a test message to your inbox.
- Your logo looks sharp in the header and the site has a browser tab icon (Appearance → Customize → Site Identity).
- No “Lorem ipsum”, sample text or stock photo watermarks are left.
- The Privacy Policy page is published and linked in the footer.
- Backups are switched on and you know how to restore one.
- Your business email sends and receives.
- Search Console shows your sitemap as submitted.
- You’ve set a calendar reminder a month before your hosting and domain renew.
That’s it: your site is live. Expect to keep tweaking for a few weeks as you see what customers ask about. That’s normal, and a site that keeps improving beats one that was “perfect” on day one.
The no-code route: your logo + Bluehost AI Builder
If WordPress sounds like too much, there’s a much faster path: make your logo first (Step 3), then hand it to an AI builder along with a paragraph about your business. I tested this with Bluehost AI Builder by building a site for a made-up gutter company, Gulf Breeze Gutters, in Southwest Florida.
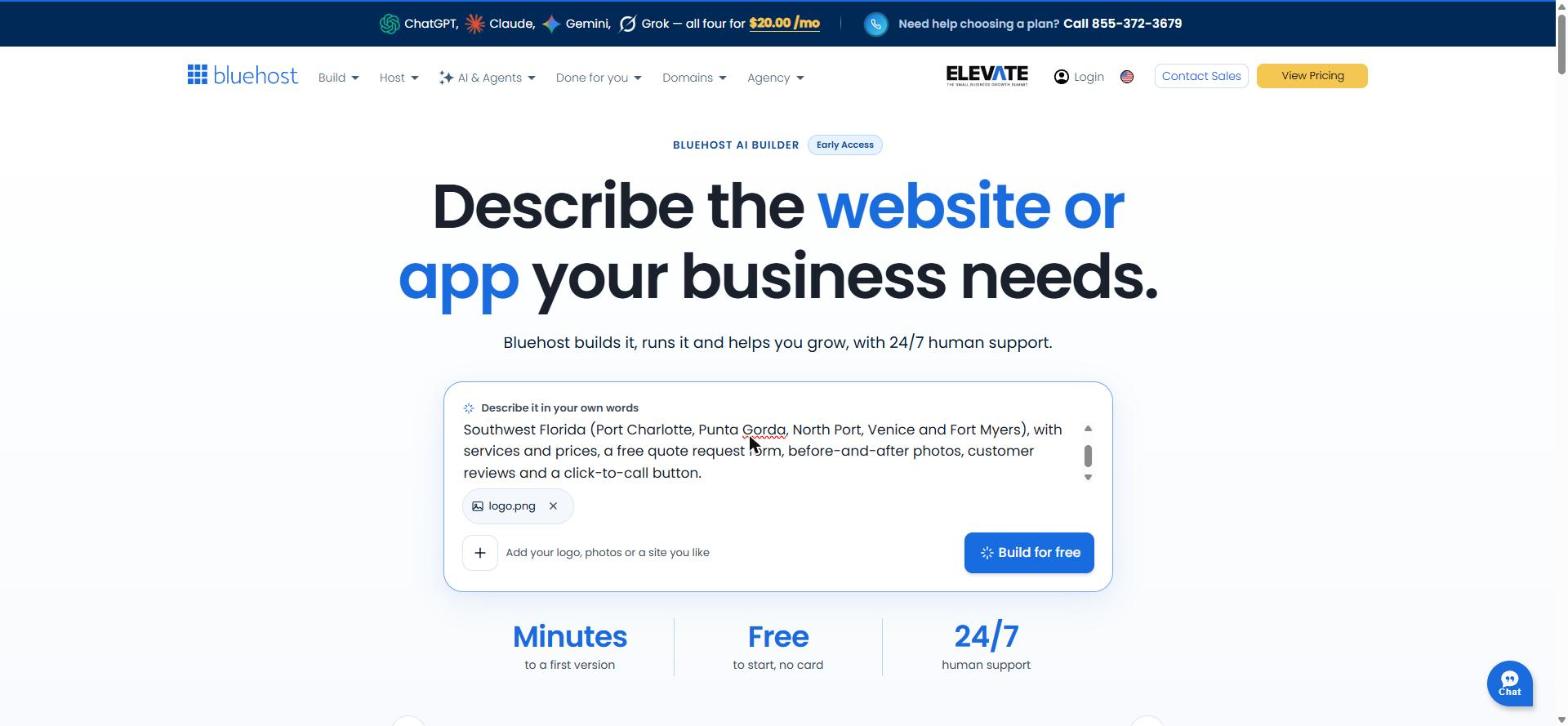
I described the business, its service area and what I wanted on the site, and attached the logo. A few minutes later I had a full homepage with services and prices, a quote form, reviews and a click-to-call button. The part that impressed me most: it pulled the colors from my logo and used them across the whole site, so the branding matched without me touching a color picker.
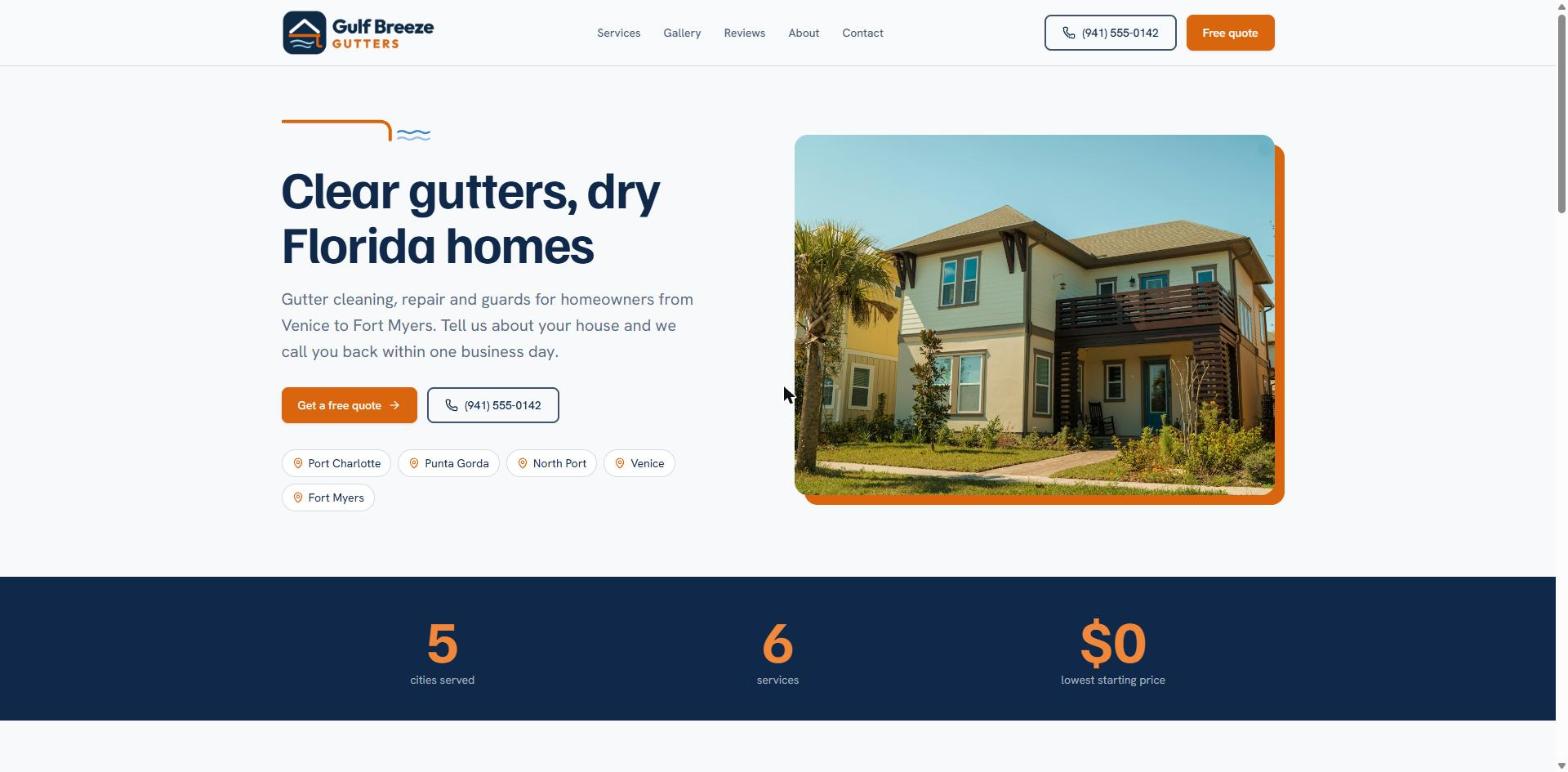
- Cost: $0 to start, no credit card. Paid plans start at $20 a month.
- Best for: local service businesses that need a clean, simple site quickly.
- Watch out for: the stock photos it adds. Replace them with photos of your real work before you launch.
- Editing: you change things by typing requests in a chat box, so bundle several edits into one message.
Make your logo free in Logomaker, then upload it to Bluehost AI Builder with a paragraph about your business. You’ll have a draft site in minutes, and you can still connect your Namecheap domain later.
Mistakes I see new site owners make
- Judging hosting by the intro price. The renewal price is what you’ll pay for years. Compare those.
- Paying for every add-on at checkout. Almost none are needed on day one.
- Waiting until it’s perfect. Launch with five good pages and improve from there.
- No backups. Check that backups are on before you need one, not after.
- Ignoring the phone. Most of your visitors are on mobile. Check every page there.
- Letting the domain expire. Turn on auto-renew. Expired domains get snapped up within days.
For most small businesses: register your .com at Namecheap, host it on Bluehost Starter on the 36-month term, design your logo free in Logomaker, get your email from Spacemail, and build with WordPress and a free theme. Total cost is about $60 for the first year. If you’d rather skip WordPress entirely, the Bluehost AI Builder route gets you a good-looking draft in minutes.
Once the site is live, you’ll want to see which keywords it ranks for. Our SE Ranking review covers one rank tracker and how it compares with Semrush and Ahrefs.
Frequently asked questions
How much does it cost to make a website?
About $60 for the first year for a simple business site: roughly $12 for a .com domain and $48 for a year of shared hosting at an intro rate. Plan for about $140 a year once intro prices end. A business email adds about $9 a year with Spacemail, and a logo and paid plugins are optional extras.
How long does it take to make a website?
A simple five-page business site takes two to four hours if your words and photos are ready. Writing the content usually takes longer than the technical setup.
Can I make a website for free?
You can build on a free plan from some website builders, but you’ll have their branding and a long address like yourname.builder.com. For a business, a real domain and hosting are worth the small cost.
Do I need to know how to code?
No. WordPress, its themes and the AI Builder are all point-and-click or type-what-you-want. You won’t write any code following this guide.
Should I buy my domain from my host or separately?
Either works. The free domain from your host is simplest. Buying separately at a registrar like Namecheap keeps your domain independent if you switch hosts, and its privacy protection is free for life.
What’s the difference between a domain and hosting?
The domain is your address. Hosting is the building where your site lives. You need both, and you connect them with nameservers (Step 5).
Is WordPress better than Wix or Squarespace?
WordPress costs less over time and gives you more control, but you look after it yourself. Wix and Squarespace handle the upkeep for a higher monthly fee. See our Shopify vs Wix comparison if you plan to sell online.


Leave A Comment